Before you begin:
|
Editing or deleting files without backing them up, can be deadly. In other words, your game is completely screwed and wont function properly, or at all!
I'M NOT RESPONSIBLE FOR ANY GAME/ DATA LOSS OR DAMAGE.**
So before you try anything, you must do this:
I'M NOT RESPONSIBLE FOR ANY GAME/ DATA LOSS OR DAMAGE.**
So before you try anything, you must do this:

|
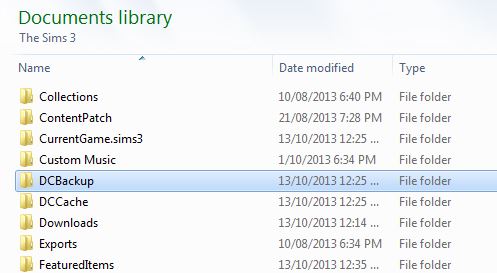
Go to "my documents" then "electronic arts" "the Sims 3" and now depending on the folder and document, you are going to hit "Copy" [for multiple documents to select, left click and hold shift and then click the last document that you want to select, they should all be highlighted]
You are going to make a folder [IN A DIFFERENT LOCATION, THIS IS VITAL AS IT COULD CORRUPT YOUR GAME ]. Then name it "Backup" or whatever relates to you, and paste the documents in there. You can now edit files in your game, and have an easy way of going back. To go back, simply delete your edited files and replace them with your back-up, or put back the files that were deleted from your folder. |
IN-GAME SETTINGS
|
Depending on your computer, you want decent settings. Settings impact the performance severely. So I thought I'd give you some recommendations.
LOW-END COMPUTERS: -Reflections off -edge smoothing low -visual effects medium -lighting and shadows medium -tree detail low/off - draw distance medium - High detail lots on 2 or 1 DRAW DISTANCE MEDIUM - texture detail high -Sim detail very high. -Advanced rendering on and animation smoothing off. HIGHER-END COMPUTERS: Depending on your system, and if it is extremely good, then you can set your settings to the maximum, but will probably cause lags and crashes. You are going to want to think about what is necessary. Is the focus going to be on your Sims, the surroundings and is lighting and shadows important? Think about what is necessary to avoid lags and crashes. If you need reflections, turn them off. But it would be easier to have them off to make your game run smoother. You may want to configure the settings differently throughout filming. As you may be filming a setting within the city, or various buildings, and need high detail lots, and a high draw-distance. Advanced rendering and smooth animation, are totally optional too. EA recommend that these are only enabled on high-end systems. so bugs and glitches should be minimal. |

*NOTE*You can have the most functional computer in the world, but your game has the possibility of crashing.
I recommend saving your game every 15-20 minutes, especially when filming. Its extremely frustrating. You may have your video files, but you're going to be spending a few hours re-setting up where you left off. |
MAKING IT RUN SMOOTHER/BETTER/QUICKER.
This is done by deleting a few files. But before attempting any of this, please back-up your files!
|
The first files that you want to delete are under the "DC BACKUP" folder. Found under "my documents" then "electronic arts" then "the Sims 3"Once you have clicked on that, and depending on how much CC or Mods you have. You are going to have lots of files in there. All they are are backup of your CC and .package files. Unnecessary in fact. But if you want to delete them, then do, it will have a good impact on performance.
*NOTE!**** YOU WILL NOTICE A "CCMERGED" RIGHT AT THE END. DO NOT DELETE THAT. IT HAS BEEN PROVEN TO SCREW UP MODS AND CC, AND IF YOU HAVE SHOWTIME; MUCK UP YOUR SIMPORT. |

|
Another way.****
This one can be a little irritating, in the fact you have to do it every time you restart your game (or near enough). You wont have to backup these files, they are completely pointless.
These are thumbnails of that lousy store-content, showed in game. The first time I went to delete all of them, I had over 2,000 .jpeg files of store content in my folder. I simply deleted them, and notices in-game thumbnails loaded a lot faster.
So do the same as before, go to your "Sims 3" folder. and select "featured items" There is probably going to be hundreds or thousands of files in there.

You may also want to delete your screenshots. Well, ones that you are not going to need in your machinima anyway.
You're going to want to do all this before you start your game up ^^^^
Otherwise it might crash your game, or it wont show up. Like I said its CRITICAL YOU BACKUP ALL OF THE FILES BEFORE YOU DELETE THEM, EXCEPT FROM THE STORE-CONTENT THUMBNAILS WHICH ARE TOTALLY POINTLESS AND USELESS.
EDITING FILES:Editing certain files can enhance film-making and have better outcomes for your machinima. Remember No back-up =No more Sims.
VIDEO CAMERA: Go to the following: Program Files/Electronic Arts/The Sims3/GameDate/Shared/NonPackaged/Ini/VideoCamera.ini Open up your .ini file. It should look like something on the right. --------------------------------------> Certain settings can be changed to speed up and slow-down the film making. It may make no sense now but it sure will when you're in camera-man mode. It looks like its Chinese or something. But its not for the computer. The numbers and digits represent certain coding that controls the camera movement and direction. Check through and you may notice the "move" right on top of the list. It may be at a different number, but you are going to change it to "0.1". This will make camera movement 90% slower. This what most movie-makers or editors use. If you change it to "1.9" this is going to make the movement 90% faster than it would be. You can decide. You may want to use both for different scenarios. You may use numbers in between, just play about and see what fits best. "LERP DURATION" is how long that it takes for the camera to get from one place to another. We will go into more detail about that when we talk about in-game camera movement. [you cant see LERP DURATION in the image, you are going to have to scroll down on the document in order to see all controls] . Anyway, LD is measured in seconds. I would recommend slow camera movement. therefore you want a high number of seconds. 7-15 seconds is suggested. You can edit these while the game is running, it automatically overwrites the .ini file. So unlike other files and folders, you can modify in-game. |

THESE ARE AKA. "PARAMETERS"
Do's/don'ts
Don't delete any files that have been confirmed okay to modify.
Do play around with settings, and if you don't know how to reset, then use your backup data. |
CONTROLS INSIDE:
This is about all the controls for the camera, inside the game.
The vital thing is that you need to press the "TAB" button. This goes into camera man mode, which easily controls the way you film. You wont be able to view the UI nor your cursor. So you can just drag the mouse around and the camera will move with it.
CONTROLS:
W- move forward A- move left S- reverse D- move right. This is just the same as the left,right,up and down arrow keys.
Q-move the camera upwards, you can go to an extent in which you get up so high, you can see the whole town,even higher up than you would be in map-view.
E- moves the camera down but keeps than angle. You can go so far down you could sink into the floor.
SHIFT + A roll the camera left
SHIFT+D roll the camera right
As explained in LERP DURATION you can set positions and move to another in just a click of a button. This is simple, but you need to be in camera man mode "tab mode" for this to work. Set a position. Press ctrl and any number from 1-9. Now move to another position, and press ctrl different number from 1-9. Say you presses 5 on the first position, you would now press five after selecting the second position, and your camera autonomously moves to that other position.
When I first learnt this, it was a little tricky to get the hang of, but now its a walk in the park. So keep practicing and you'll make it!
REMEMBER: Depending on your .ini file settings, your camera is going to move fast or slow. Adjust to what fits best.
You're Ready to move on.
